Shhh, there’s a dragon sleeping in the garden!
If you have been looking for ways to make a larger dragon quilt (the original Dragon Dreams pattern is for a crib size), I am happy to tell you that I have a new upgrade option for you today!
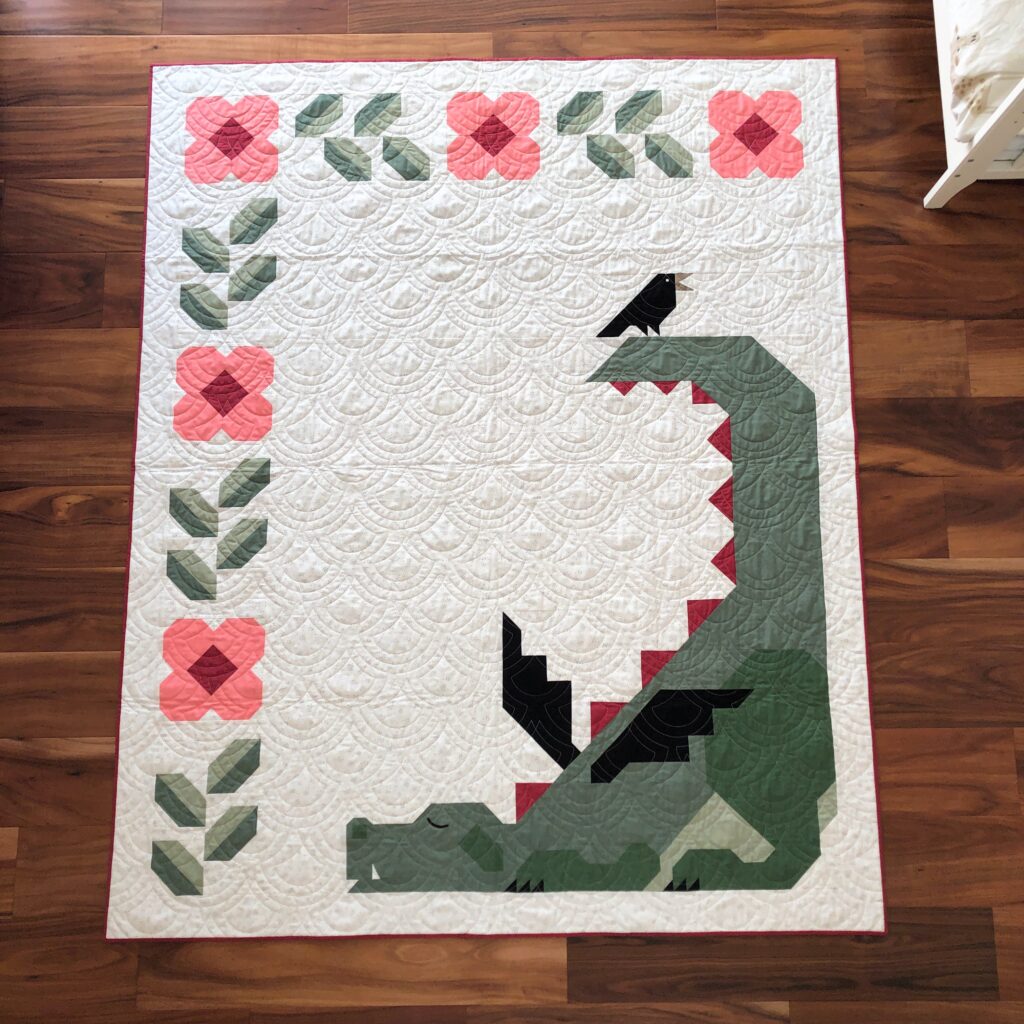
The flower banner from my newly released Unicorn Garden quilt pattern also perfectly works to host a little sleeping dragon. It even leaves enough room for a little feathered friend to sit on his tail, woohoo! The Dragon Dreams throw shown below measures 59″ x 72″, which I think is a great size for an older kid or yourself!
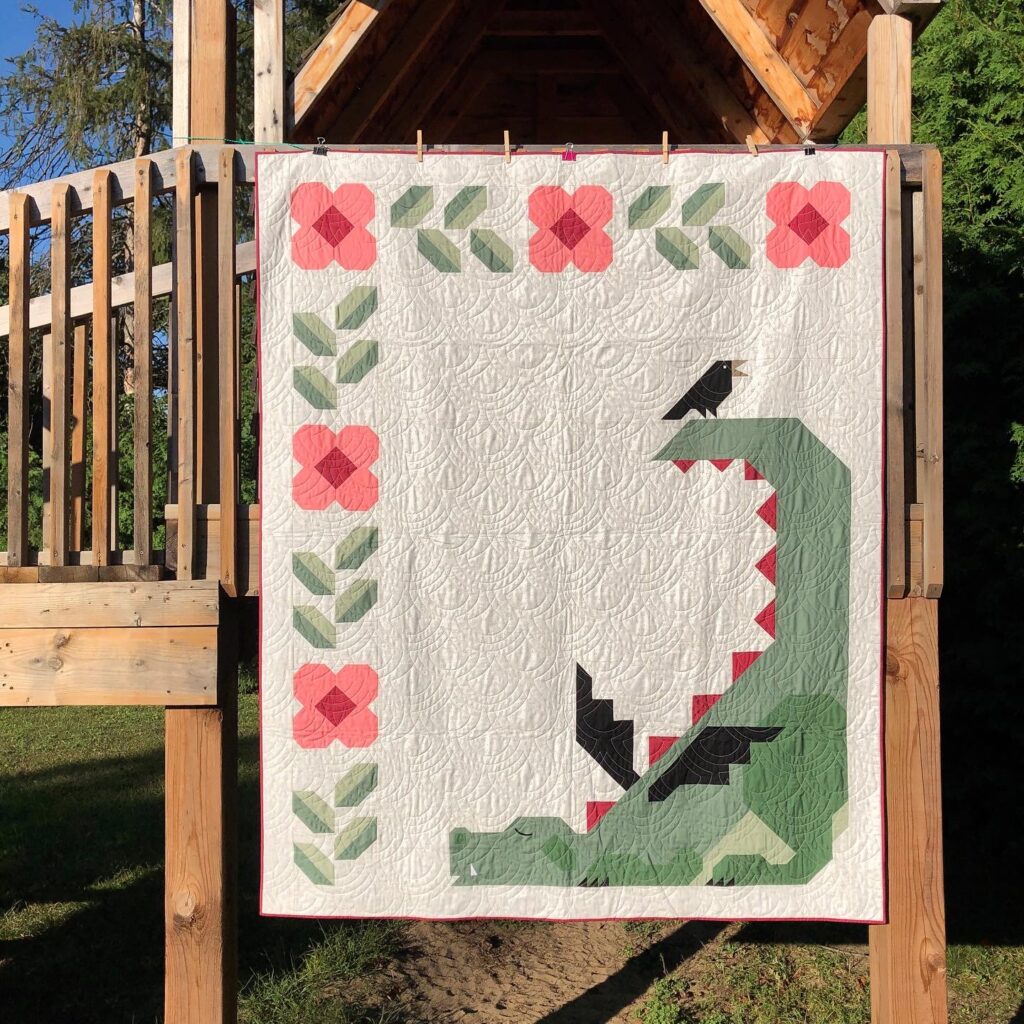
So, if you’d like to make your own, please stay around and have a look at the step-by-step instructions below.
A few notes before we start
- You will need the following quilt patterns:
- The dragon: Dragon Dreams (get the pdf or printed booklet)
- The flower banner: Unicorn Garden (get the pdf or printed booklet) OR
Vintage Bloom (get the pdf) - The crow: Little Crow (get the pdf)
- If you’d like to put a crown on your dragon’s head as an additional feature, this tutorial has all the details.
Fabric requirements

Making your dragon and flower throw quilt
Dragon section
- Prepare all the pieces for colours 1-7 as described in your Dragon Dreams pattern.
For colour 8 (background), instead of your LL, dd and ff pieces, prepare the following five background pieces:
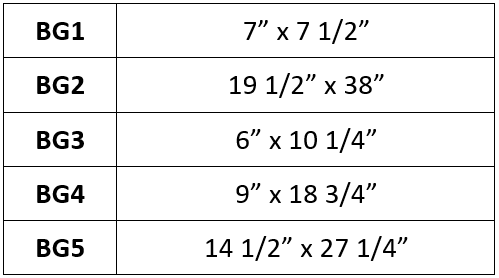
To cut your background pieces efficiently:
- Cut all the background pieces (except LL) as shown in the lower half of Fig. 7 of your Dragon Dreams pattern. starting with the [7.5″ x WOF] cut.
- Cut a [19.5″ x WOF] strip and sub-cut BG2.
- Cut a [14.5″ x WOF] strip and sub-cut BG5.
- Cut a [9″ x WOF] strip and sub-cut BG1, BG3 and BG4.
And… let’s go! Using the patterns listed above, make your dragon, crow and flower banner sections as described below.
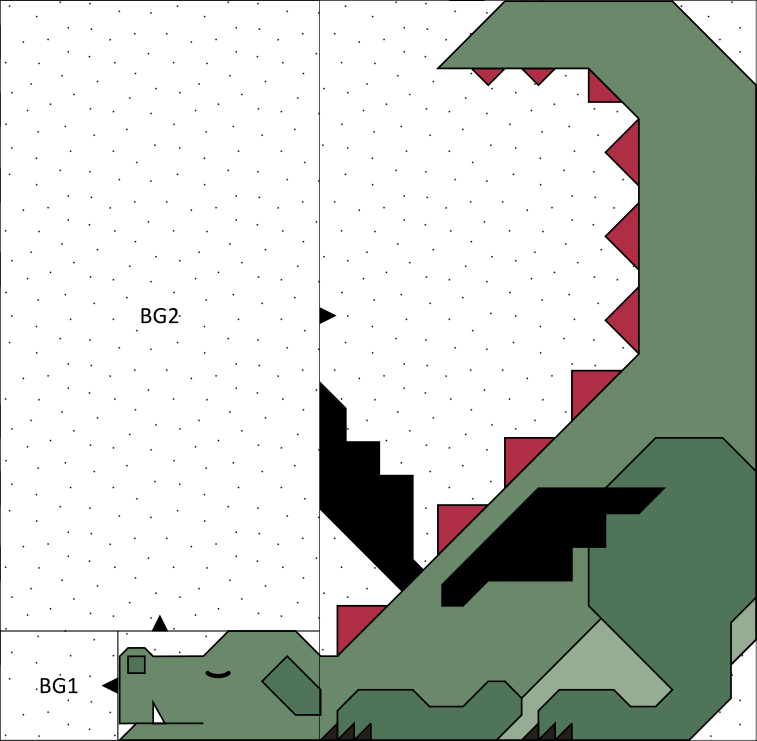
- Follow steps 1 to 81 of the Dragon Dreams quilt pattern (using the BG1 piece instead of the LL piece and the BG2 piece instead of the dd piece) to make the dragon section shown below.
Crow section
- Make a large, right-facing crow block following the Little Crow pattern. Use up some of the background fabric scraps you’ve accumulated by now!
(If you prefer your bird to not be black, you can make a more colourful friend for your dragon of course! The pattern also includes an optional accent colour option for the bird’s belly.) - RST, sew your BG3 piece to the right of your crow block and press your seam towards the BG3 piece.
- RST, sew your BG4 piece to the top of your crow unit from step 4 and press your seam towards the BG4 piece.
- RST, sew your BG5 piece to the left of your crow unit from step 5 and press your seam towards the BG5 piece.

Flower banner
If you are using Unicorn Garden:
- To make your horizontal and vertical flower banner sections, prepare all pieces of colours 6-9 and the following colour 10 (background) pieces:
x (40x), y (60x), BB (10x), cc (10x), dd (9x), gg (2x) and hh (2x). Again, use your background fabric scraps from previous steps to sub-cut your smaller pieces! - Then simply follow steps 68 to 76 of your Unicorn Garden pattern.
If you are using Vintage Bloom:
- To make your horizontal and vertical flower banner sections, prepare the following pieces: A (20x), B (20x), C (3x), D (3x), E (60x), F (40x), G (10x), H (10x), I (9x), and 7 [3.5″ x WOF] strips for the borders. Again, use your background fabric scraps from previous steps to sub-cut your smaller pieces!
- Using your A–I pieces, make 5 flower blocks and 5 leaf blocks according to the Vintage Bloom pattern and assemble the two banner sections shown below.
Please note: You will only need 20 of your HSTs to make the leaf blocks and the leaf block at the bottom of the vertical banner section has no I piece at the bottom!


Assembly of your Dragon Dreams throw quilt top
Ok, let’s assembly all those beautiful quilt sections!
- RST, sew your your crow section from step 6 to the top of your dragon section from step 2 and press your seam towards the dragon section.
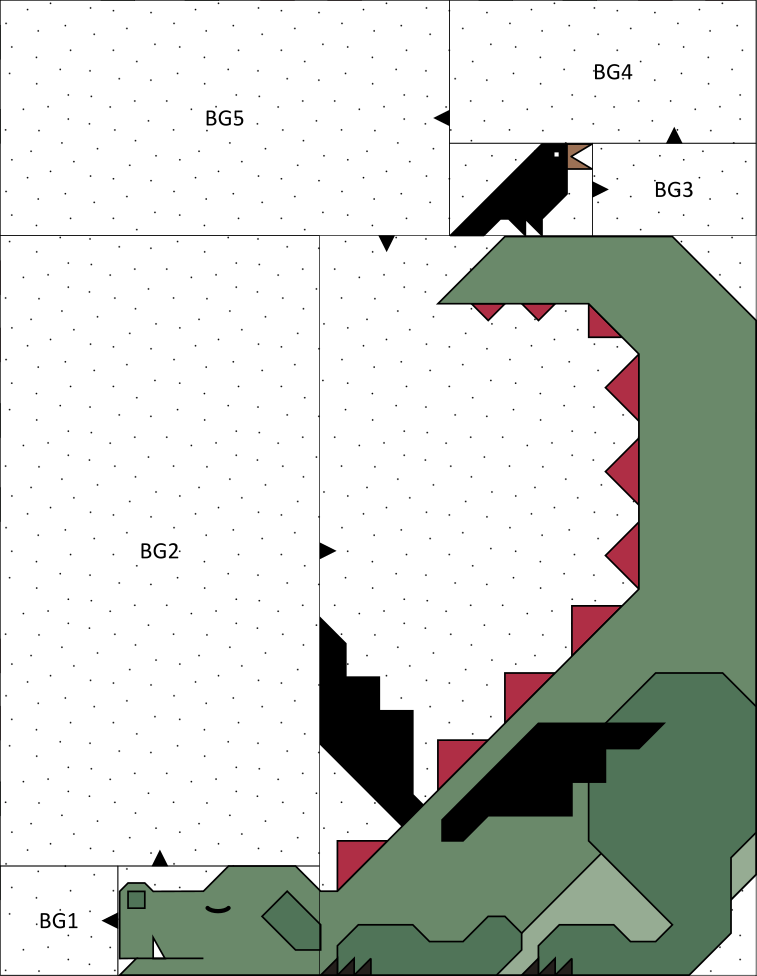
- If you are using Unicorn Garden:
Follow steps 77 to 81 of the assembly instructions.
If you are using Vintage Bloom:
Join your [3.5″ x WOF] strips end-to-end and sub-cut your borders: 3.5″ x 53.5″ (2x) and 3.5″ x 72.5″ (2x). Refer to the diagram below to assemble your quilt top.
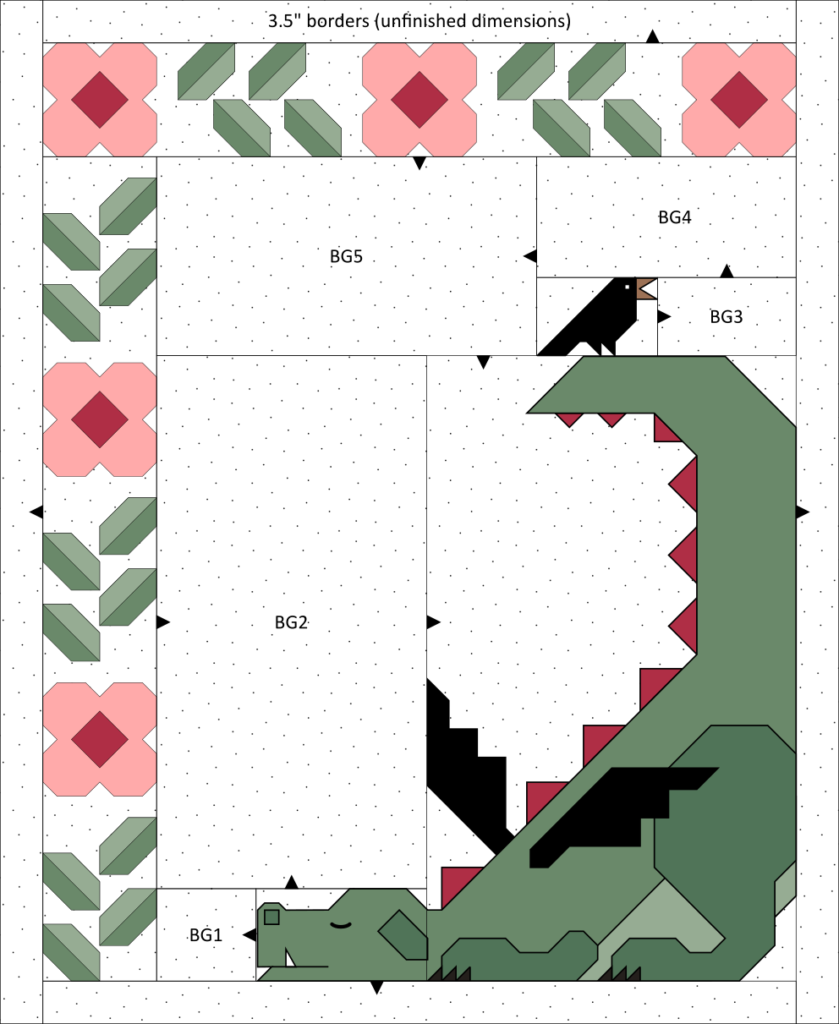
- Finish (baste, quilt and bind) your Dragon Dreams flower throw quilt as desired.
There! That wasn’t so bad, was it?!
I’m always trying to give you the confidence to adjust my patterns to your needs if you are looking for different sizes. And the adventure spirit to truly customize your quilts by adding new elements or otherwise changing things up a bit. I hope this tutorial was helpful in that regard! If you are looking for more inspiration, please check out my Pattern Blender resource, where I’m compiling all my ideas. Or let’s say those that have been translated into a tutorial. 😉
Happy sewing!
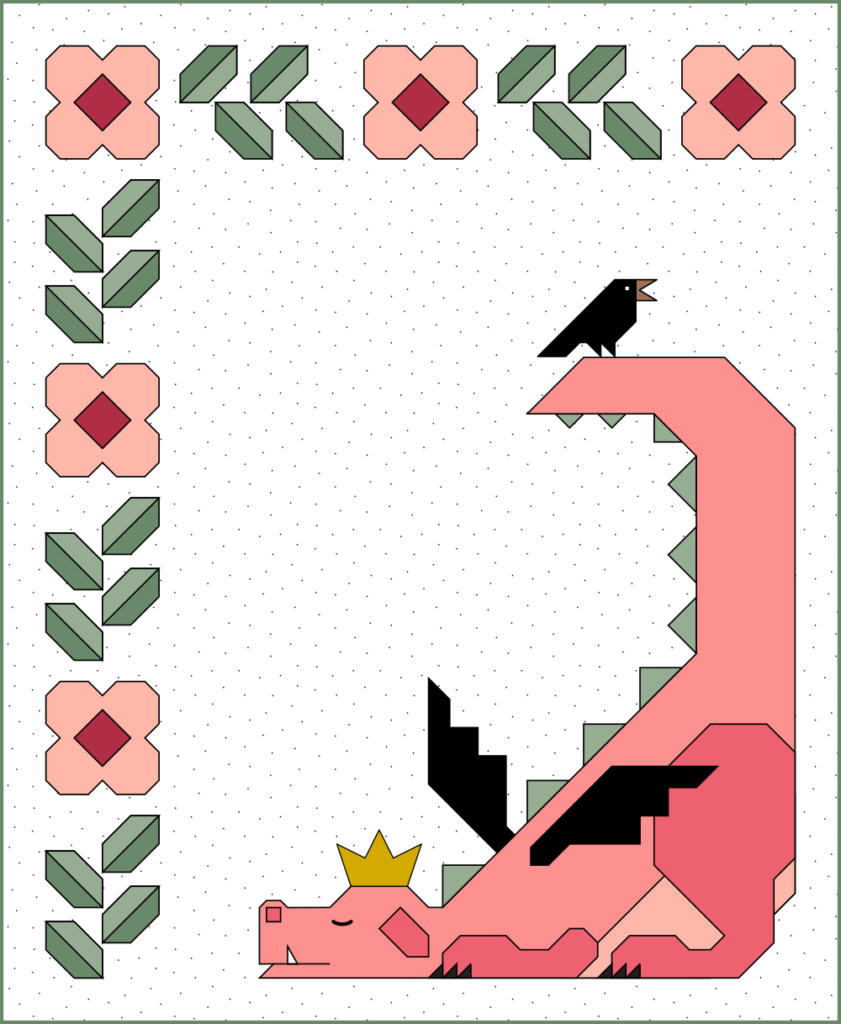
PS: Just had to add another colourway featuring a pink dragon and the above-mentioned crown detail (more details in this tutorial). 🙂

Can you provide the Kona colors for the green dragon and pink flowers that was used?
I just sent you an email 🙂
Made this…love it!!
Woohoo! 🥳
Didn’t get the download. And no it is not in my junk…paid a chunk for your pattern. Filled out the forms and you keep,telling me it is not my email address…what is with this site?
My apologies for the tech issues – I just sent you an email!
Astrid
I just finished this pattern and loved it. Thank you for awesome cutting and piecing instructions.
So glad to hear! Thanks, Heather!
Oh my gosh, I love the Dragon Garden blender!! **wanders off to measure office wall space for another hanging….
I also adore the quilting pattern. Do you remember what it is? We used an amazing castle e2e pattern on my Dragon Dreams baby quilt but I love how this looks!
It was Geisha by Urban Elementz. Turned upside down though to resemble scales 😀
Hahaha, I love it! 🙂