Everything is quiet in the little kingdom while Smoke is sleeping in the foothills nearby.
It had been a long winter though and when the first warm sun rays woke the young dragon up yesterday, he couldn’t help but spread his wings and race through the fresh spring air with the birds. He felt so happy and full of strength that he might have scared the villagers a little more than necessary.
And while he is still dreaming of his next adventure, the new morning’s sun is already tickling his nose…
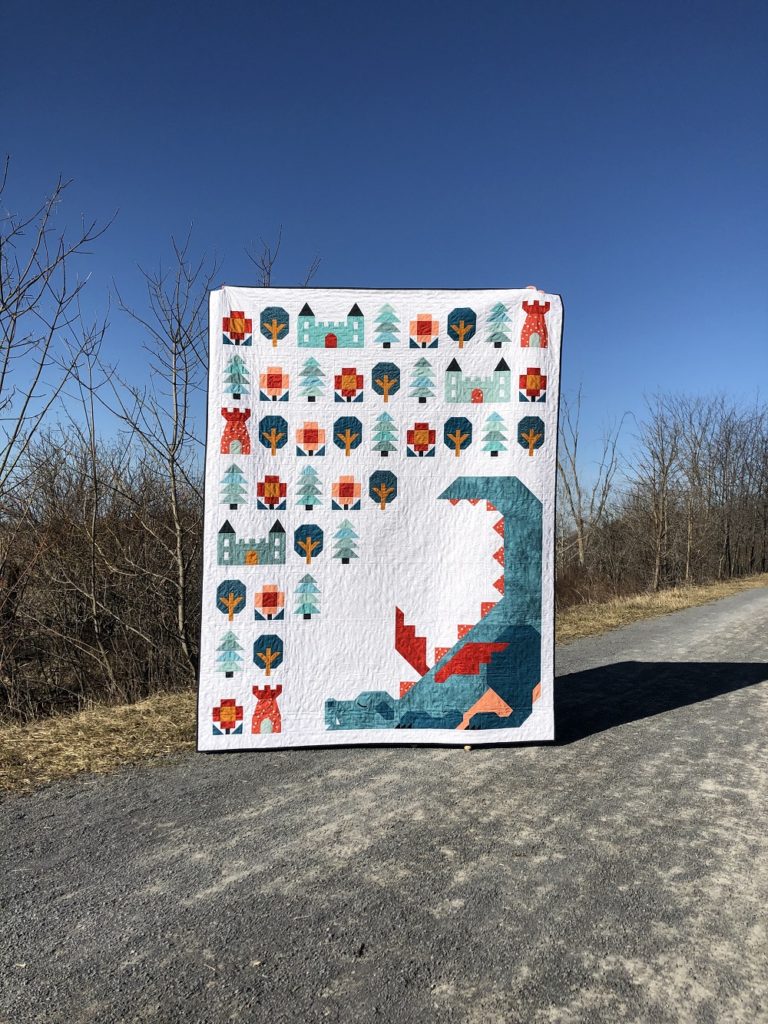
Ever since I shared the first version of my Dragon Dreams crib quilt I have had people sending me messages that they would like to make a dragon quilt for an older kid or themselves rather than a little baby. Which is great, because I never intended to limit the design to tiny humans, ha!
The original Dragon Dreams quilt pattern is for a crib-size quilt of 40″ x 50″. In this tutorial I’ll show you how you can upgrade to a twin size of 62.5″ x 80″. Woohoo!
Essentially, you’ll be building a little village or kingdom around your dragon.
Notes
A few notes before we start:
- The quilt shown above uses elements from 3 different quilt patterns:
- The dragon: Dragon Dreams (get the pdf or printed booklet)
- The castles and towers: Little Kingdom (get the pdf or printed booklet)
- The trees and flowers: Tiny Town by Pen + Paper Patterns (find it here)
Please note: This pattern also includes three different house blocks not shown in this tutorial which can be used to build your village around the dragon.
- Sashing and border dimensions are as stated in the Tiny Town pattern with one exception: since the village in this tutorial has one more row of blocks as compared to the layout described in Tiny Town, your left and right borders need to be longer by 9.5″.
- All seams between quilt blocks and sashing/border strips are pressed towards the sashing/border strips.
Making your dragon-guarded village quilt
Making your dragon
Ok, let’s get stitching and let’s start with the dragon! There are only a few small modifications required as compared to the original crib quilt pattern:
- Instead of your LL, dd and ff pieces, prepare the following 5 background pieces:
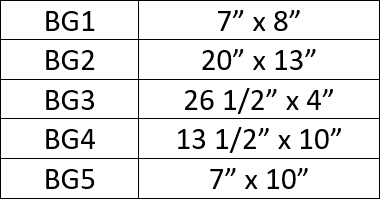
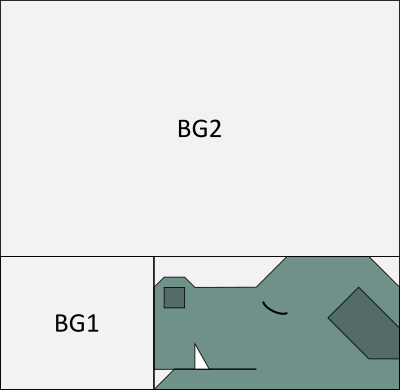
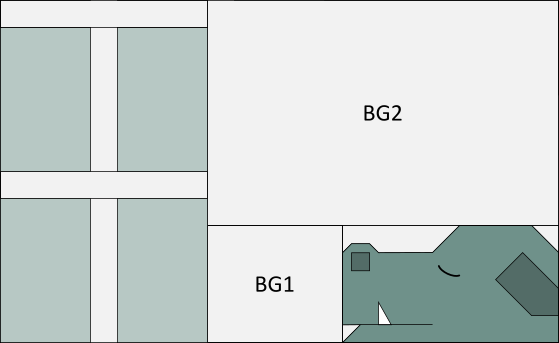
- When making the head section, replace the LL piece by your BG1 piece. Add the eye detail, then add your BG2 piece at the top.
- Make all other body sections of your dragon exactly as described in the pattern.
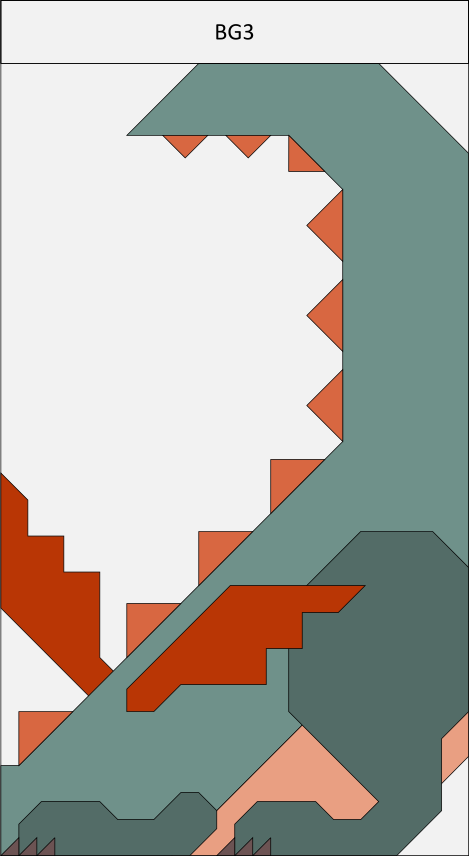
- After joining your tail, wing and leg sections, add your BG3 piece at the top.
Building your village or kingdom
Time to build your little village! Each grey rectangle in the pictures below represents a house (cottage or duplex), tree (pine or oak), flower or tower quilt block. Bungalow and castle blocks are as wide as two rectangles. For the shown layout you need a total of 43 blocks. An overview of all the blocks I used in my sample with fabric requirements follows below.
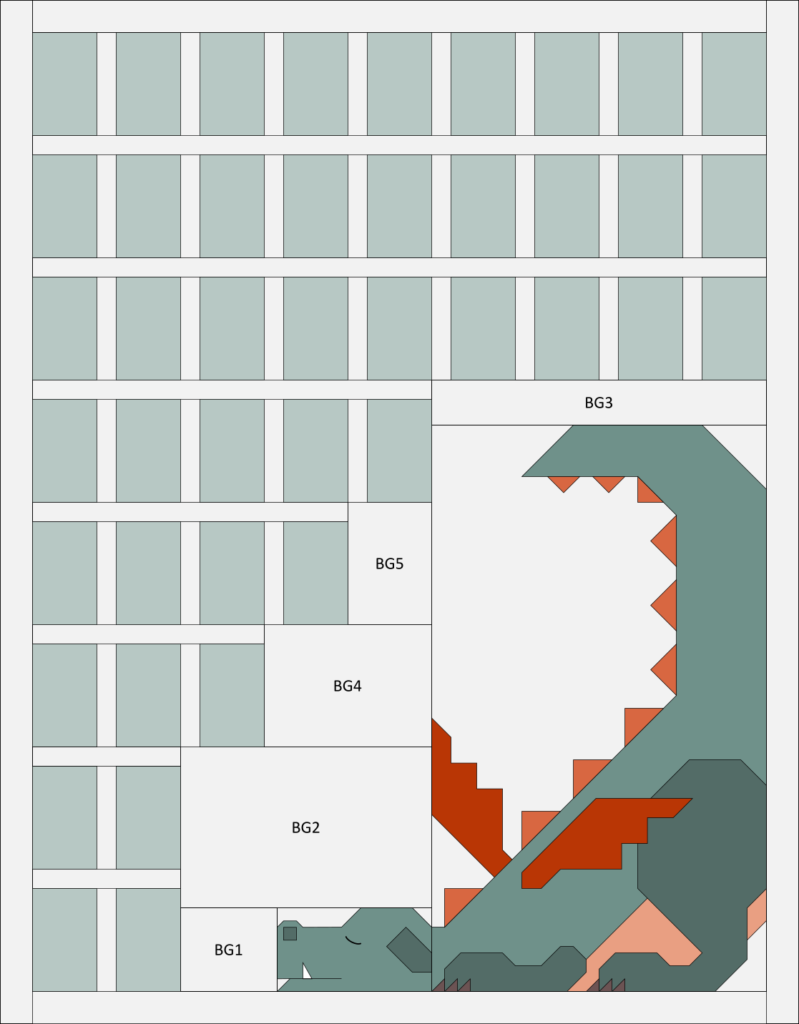
- Prepare 43 village blocks (bungalows and castles count double!) and, using the sashing dimensions from the Tiny Town quilt pattern, arrange them as follows:
- 3 rows of 9 blocks
- 1 row of 5 blocks
- 1 row of 4 blocks
- 1 row of 3 blocks
- 2 rows of 2 blocks
(Each row should start and end with a block and have a piece of vertical sashing between blocks.)
- Add a strip of horizontal sashing to the top of each row of village blocks, except for the top 9-block row which gets a border strip instead.
- Join your three 9-block rows.
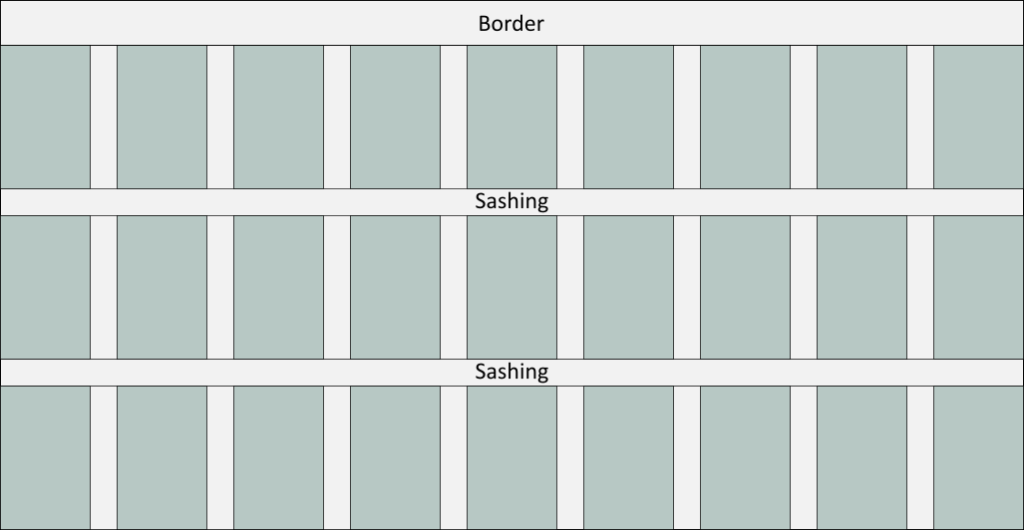
Assembly of your village and dragon sections
- Join the two 2-block rows and sew them to the left of your dragon head section from step 2.
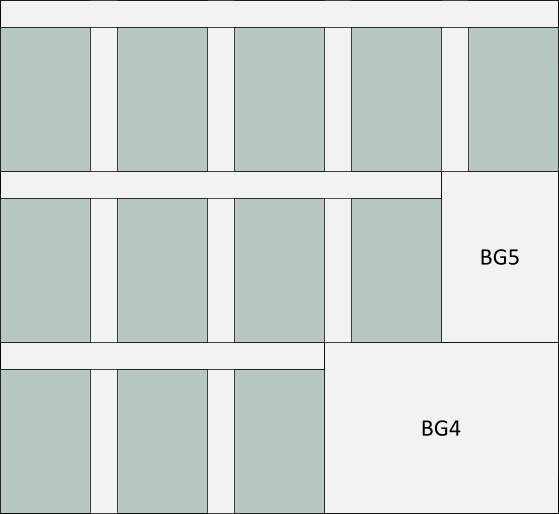
- Sew your BG4 piece to the right of your 3-block row.
- Sew your BG5 piece to the right of your 4-block row.
- Join the 2 units from step 9 and 10 and add your 5-block row at the top.
- Sew your unit from step 11 to the top of your dragon head unit from step 8.
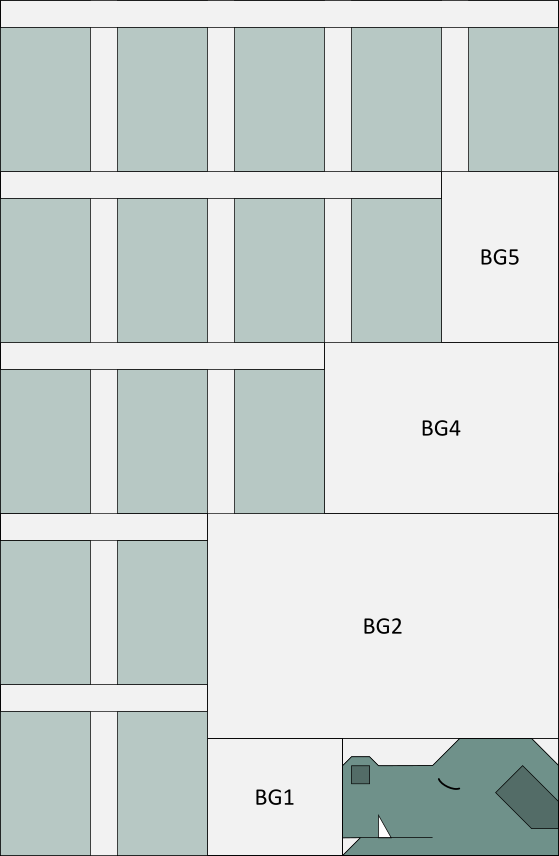
- Sew your unit from step 12 to the left of your dragon body unit from step 4.
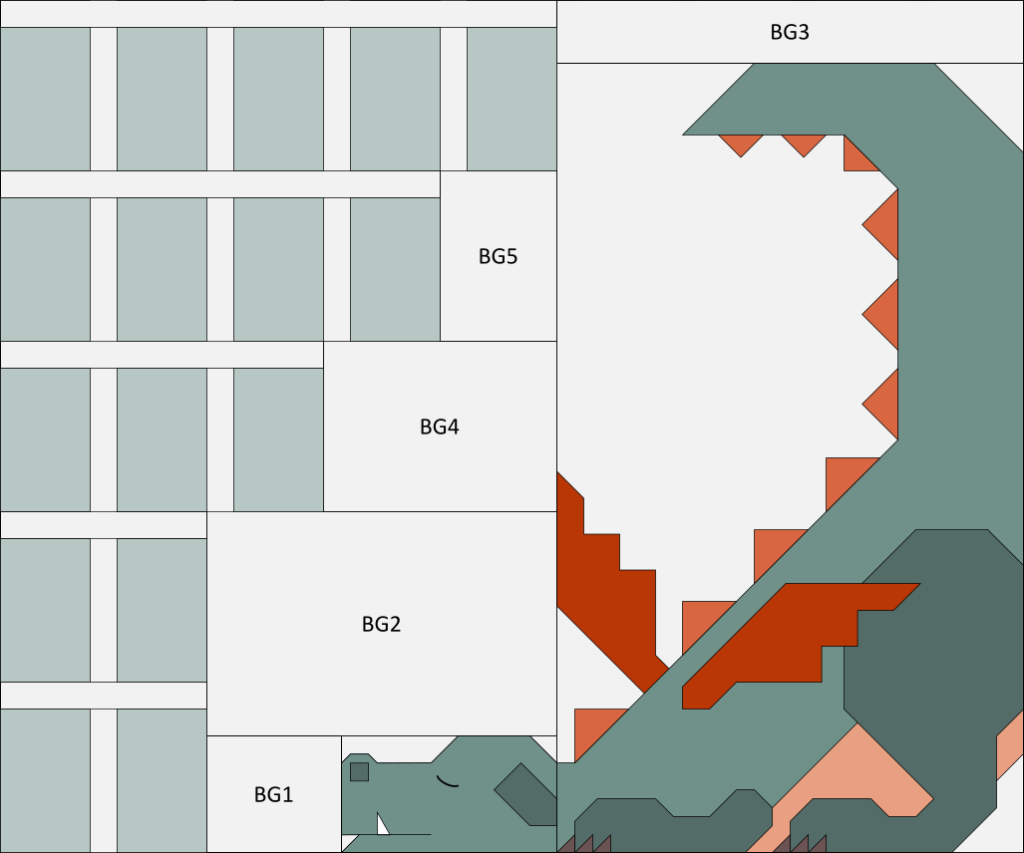
- Add a border strip to the bottom of your dragon unit from step 13, then add your village unit from step 7 at the top.
- Add border strips to the left and right and tah-dah, you’ve completed your quilt top!
Details of my dragon quilt
If you would like to replicate the layout of my quilt, these are the blocks I used to build my little kingdom:
- 12 pine trees

- 11 oak trees

- 11 flowers (I did 5 and 6 in two different colours)

- 3 castles

- 3 towers
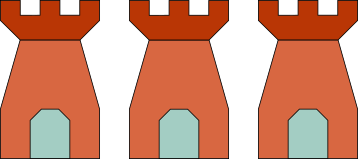
And here is an overview of how I grouped my colours:
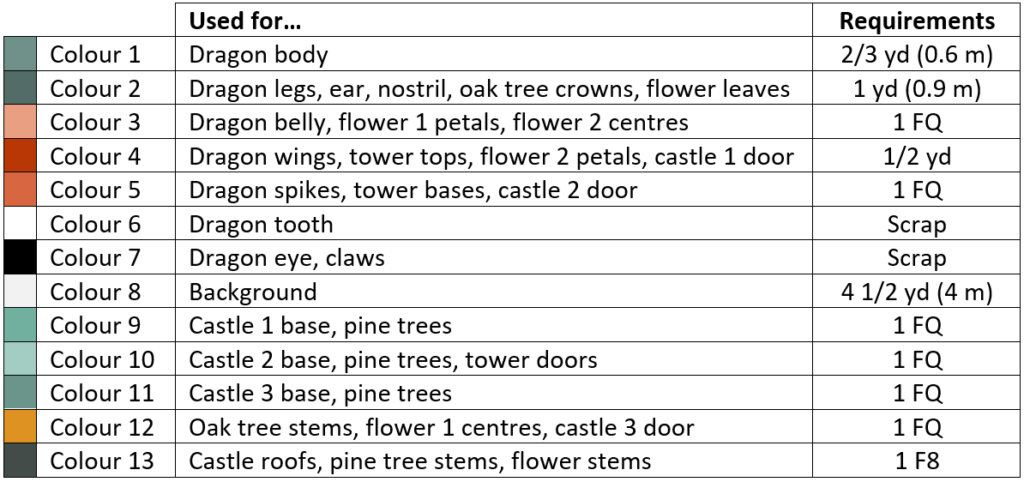
I basically went for a mix of brick reds and dusty teals with some coral and golden accents and I’m not gonna lie – this colour combo still has me drooling. I know I will eventually move on to another colour adventure but right now I want to use these colours for ALL my projects!
And here is an overview of how I arranged my village blocks around my dragon.
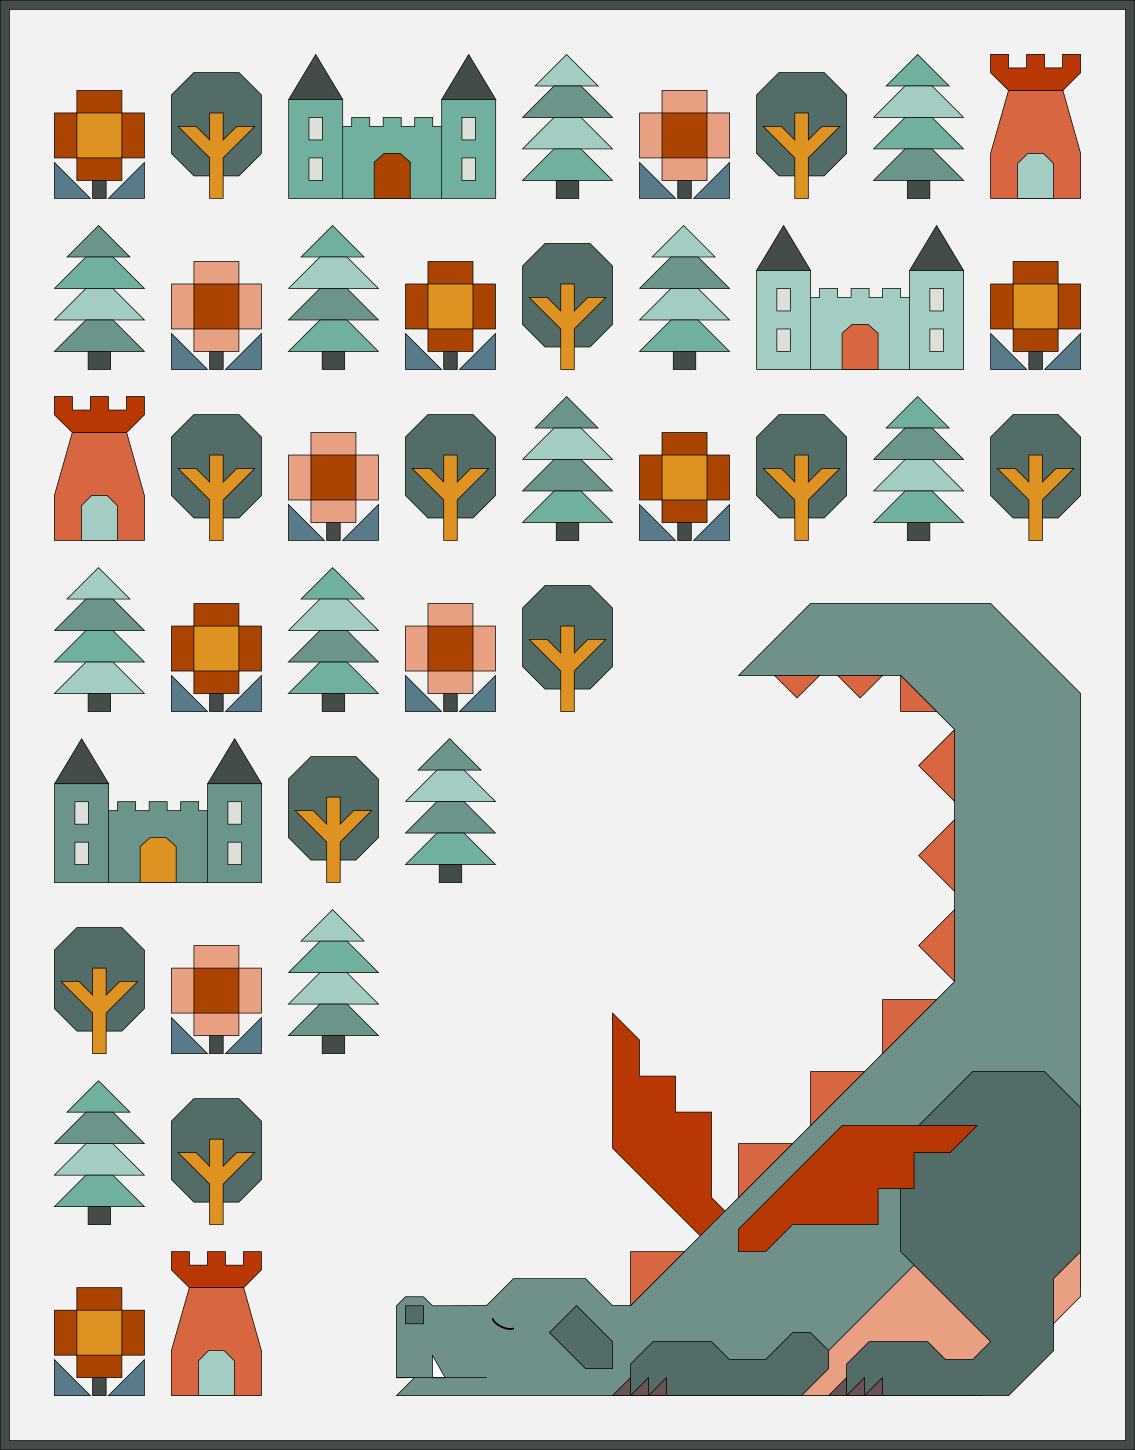
Because the village around the dragon is block-based, you can easily change the dimensions of your quilt. Simply add or remove one or more rows or columns to make a throw, queen or even king size. But whatever size you choose, don’t forget to share your project on social media using the hashtags #DragonDreamsQuilt, #LittleKingdomQuilt and/or #ApplesAndBeaversPatterns! I would love to see your creations!
I hope you enjoyed this tutorial and have lots of fun stitching up your own dragon-guarded kingdom!
Now you just need to add some cute pillows and you’re ready to cuddle!
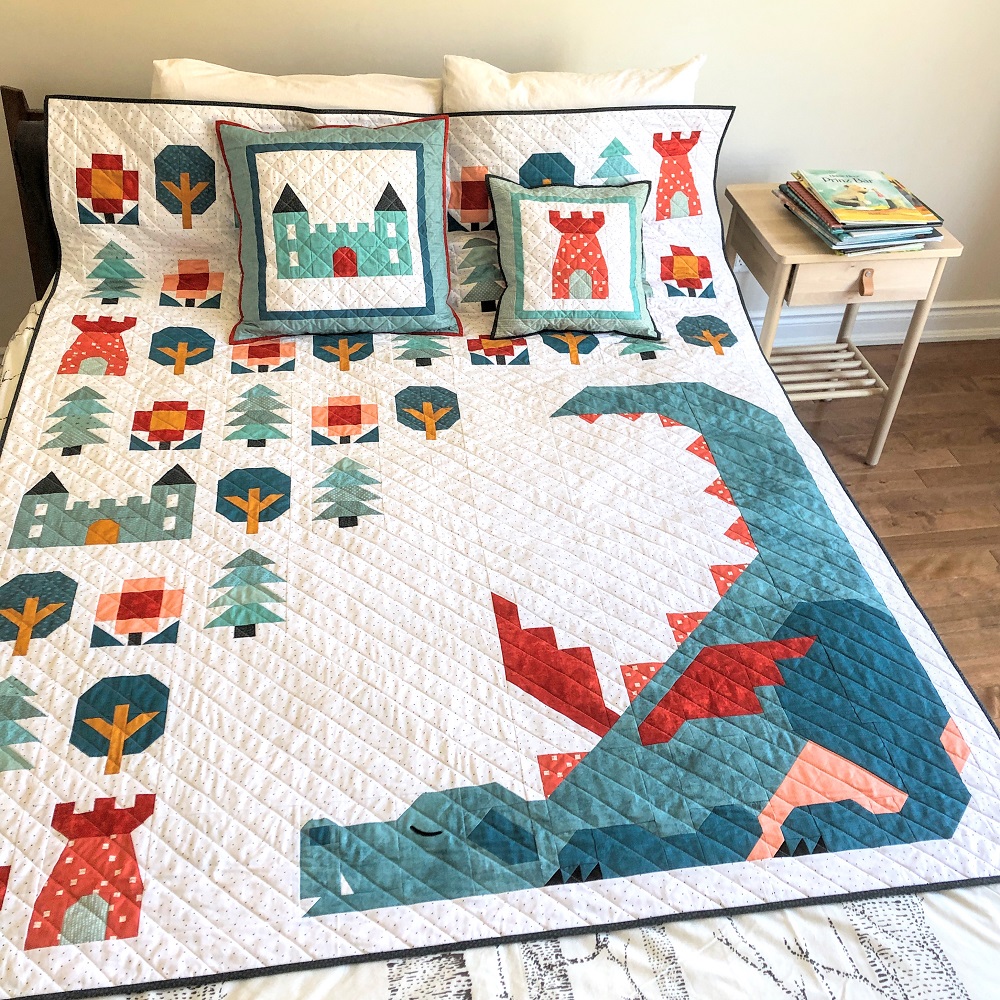
UPDATE:
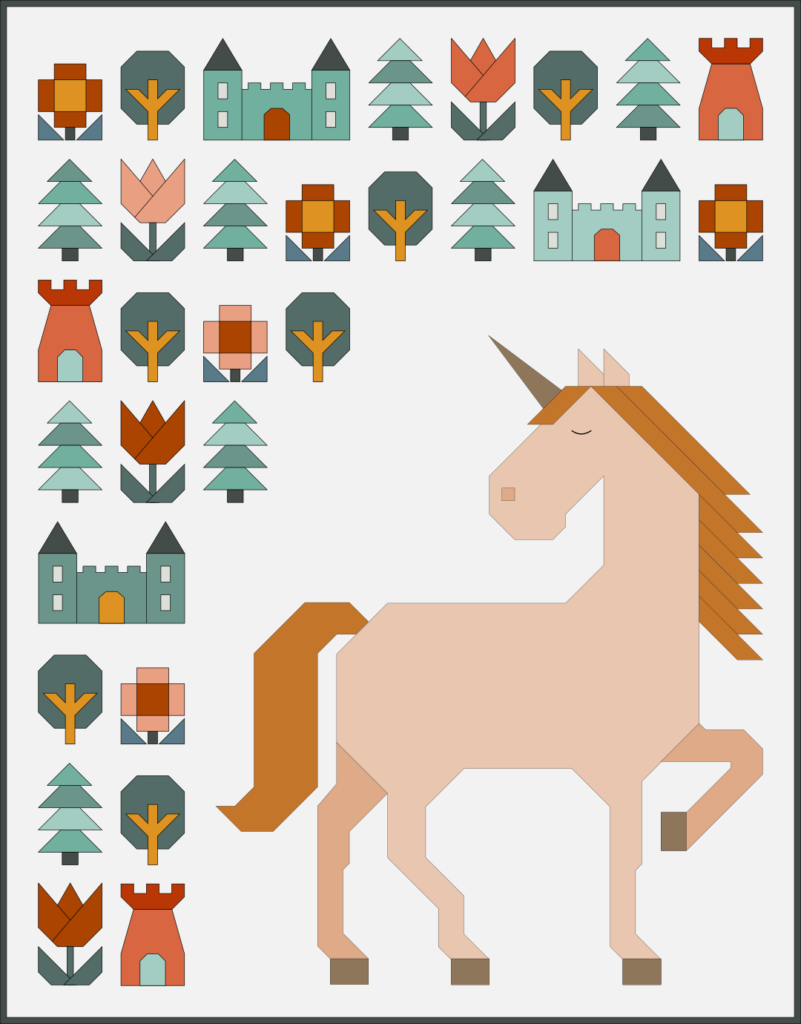
Pssst, you could also follow the same concept and build a village around the unicorn from my Unicorn Garden pattern (pdf or printed booklet) and/or add some of the smaller sized short tulip blocks from Paper Tulips (pdf or printed booklet) – without the J piece that block also finishes at 5″ x 8″. I haven’t figured out the exact dimensions of the background pieces yet, but I’m sure you can also do that. Look how sweet!

I’m wondering if you have made the Unicorn Garden quilt with the flowers bordering all sides? Would that work to make the upgrade to a twin size quilt? I am trying to plan out what pattern blender blocks I need to purchase.
Hi Sara, I just sent you an email. 🙂
Hello!
I would like to make this pattern in an extra long twin size, would I just add another row at the top, and have 4 full rows of village buildings, or is there a specific way I would nee to measure the blocks to achieve the longer length? Thank you so much, I am absolutely in love with your patterns!
Hi Katie,
Yes, you could simply add a full row at the top. And if you want your quilt wider, you could also add one block to so the side of each row. The dimensions of the background pieces BG1-5 remain the same, just your borders and horizontal sashing would need to be a bit longer.
Good luck!
I’ve seen the Dragon Dreams with fairy add-on. Did you do this & if so, where do I get this add-on???
Yes, I have a tutorial here:
https://applesandbeavers.com/in-a-land-of-dragons-and-fairies/
I know somewhere I saw that you added smoke….where was it please
Thanks for asking – that wasn’t me though. I’ve seen several examples on Instagram too, but can’t remember a specific maker unfortunately. Sorry!
If you please, how wide/long is the sashing? I am Using my own “filler” pieces rather than the town pieces, but can’t seem to figure out how wide the sashing pieces should be?
Hi Krichele,
I cut 2″ strips for the sashing. Various lengths, as I matched each strip to the corresponding block units. In my example, the blocks finish at 5″x8″, not sure about yours.
Good luck!
Thank you!!
Has anyone made the dragon and the unicorn together? Just wondering what the width would be. . .
Hi Lise,
I haven’t seen a combined quilt with the two creatures side by side yet. The dragon is 38″ wide and the unicorn 43″. Just to give you an idea…
By far this is my favorite quilt…ever! Added prairie points to the dragon spikes as another tactile effect for baby and they add another dimension to this adorable quilt. Thanks for sharing your creativity!
What a great idea, I love that! Thank you for sharing! <3
I would love to see your quilt and how you added the prairie points!
Hi we are just finishing the quilt and are wondering if the blocks are cut down to 8” x 5” or 8 1/2” x
5 1/2” because the size for the sashing is 8 1/2 “high? Thanks for any suggestions
5″ x 8″ are the finished block dimensions, no trimming required 🙂
I’m confused as well. My castles and towers are 8 1/5 inches tall but all my trees and flowers finished at 8. The sashing says cut at 8 1/2 high and now it sounds like you are saying 8. Should I trim my castles to 8? I’m worried if I don’t correct in the right direction then it won’t line up with the dragon.
Hi Deanna,
I hope this is just about the wording. “Unfinished” means the blocks are completed but not yet sewn into the quilt top (no sashing added yet). So they’re still 1/2″ larger in both dimensions than in the final quilt, which is typically referred to as the “finished” state. For this quilt, all single completed blocks should measure 5 1/2″ x 8 1/2″. Once sewn together with a 1/4″ seam allowance they should be 5″ x 8″. Hope this makes it clear! 🙂
Yes. That does help a lot. Thank you. I made the dragon for my baby and it’s adorable. I loved it so much I’m working on the twin for my older kiddo.
I got these 3 patterns for my birthday in Aug. I just had a new grand baby and this combo is going to be her first quilt in her just starting quilt collection. I’m so glad I was able to find this fantastic tutorial on how to incorporate the 3. I hate math and you did my math!!! Fantastic!!!! Thanks so much!!
Awe, that makes me so happy! And that’s one lucky little baby girl! <3
I purchased the dragon quilt pattern to make for my daughter. I have been sewing for a long time, however I’m fairly new to quilting, so it looked a little daunting. This pattern has amazed me, it has been so wonderfully complete, thorough and easy to understand, from the layout for cutting your material to the end.
Thank you it has been such a pleasure!
Oh thank you, Diana! Such wonderful feedback really means so much to me!
I have purchased the crib size (and love it 🥰 ). I want to upgrade to the twin size please share how many things I still need to purchase. I just want to get it right.
Thanks, Betty! There’s a table towards the bottom of the post with an overview of all my blocks, colours and fabric quantities 🙂
I can’t wait to get started on this adorable dragon quilt.
Do you have the changes to make the twin size in a downloadable pdf? My sewing machine and computer are in two different areas of my house.
Thanks for the great pattern. I’m giving him a crown too !
Sandy B
Yay, I’m glad to hear! Unfortunately, I do not have the instructions in a downloadable format. I didn’t foresee these logistic challenges 😛
I love this version of your Dragon Dreams quilt. I am going to sign up for it with Thimbles and Things, will you be covering how to make this version rather than just the plain background one?
Thank you
Thanks Margaret, I’m looking forward to this class! I will not cover in detail how to make the additional village blocks, but basically show it as an option to make a larger quilt and refer to the instructions here.